Eating Catalan: Fideua

 394318805_f680df6fe0.jpg
Fideuà with Allioli


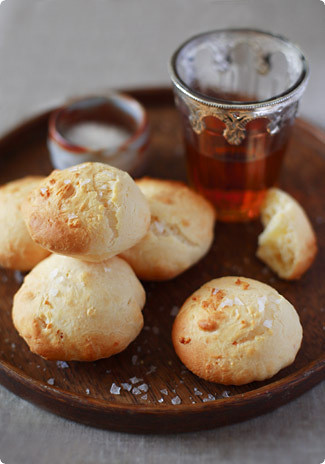
Catalan cuisine is a cauldron full of prawns and monkfish simmering in a rich broth in the galley of a fishing boat off the Costa Brava; it’s a brace of rabbits roasting on an open fire beside a slate-roofed farmhouse in the Pyrenees while a grandmother with a strong arm beats olive oil and garlic into a thick, emphatic sauce; it’s an elegant salad of white beans, celery leaves and salt cold posed on a cool black plate in a restaurant dining room in Barcelona. It’s also anchovies, foie gras, pigs’ feet, snails, grilled green onions dipped in spicy nut sauce, pigeon breast infused with vinegar and herbs, eggplant and peppers baked in ashes, veal braised with mushrooms, duck stewed with pears, paella, potato omelets, custard glazed with burnt sugar, fresh green figs drizzled with anisette, toasted hazelnuts still warm from the oven… (Colman Andrews, Catalan Cuisine)

 
The first time I was in Catalonia, I don’t think I tasted a single local specialty. I was seventeen and stranded in Barcelona for two weeks, awaiting a shipment from my parents that included the Eurail pass I needed to travel around Europe for the next three months. Barcelona was supposed to be just a quick stop on my way out of Spain, a place to gather my wits before heading out to experience the wide world of Europe that lay beyond the confines of the small town in the Basque Country I’d called home for the past nine months.

To ease the transition to total independence I had accepted an offer to stay with some friends of my host family in Barcelona. While shacking up with locals is usually the ideal way to experience whatever delicacies a region has to offer, in this case it unfortunately wasn’t, as the locals in question were a Syrian-American couple more interested in feeding me baba ganooj and enchiladas than introducing me to anything Catalan. The fact that I was on a skinnier-than-shoestring budget didn’t help my food situation either. Even though I wasn’t paying for accommodation or most of my meals while in Barcelona, my stay in the city wasn’t figured at all into my overall travel plan, and I knew that spending too much there might force me to miss something unmissable later on. I had, after all, intended to be there only two or three days, but somehow that absentee shipment from my parents stretched a short stopover into an endless waiting game. So I counted out the pennies for my daily ration of bread, cheese and chocolate, and wandered the city streets alone, biding my time until I could finally leave Spain and get on with the real business of traveling.

It was another three years before I got a taste of what I had missed in Barcelona, and even then, it was barely a taste. Manuel and I had just met, and sensing that this was a guy I wanted to travel with for many years to come, I followed him back to Germany, where (never content to sit still) we hopped in his rusty old Citroën deux chevaux and drove all the way to Spain. We somehow ended up at the seaside resort of Tossa de Mar, a jewel of a village on Catalonia’s rugged Costa Brava, and checked ourselves into Tossa’s spacious and reasonably-priced campground. Despite sleeping in a tent, money was pretty tight, and most nights spaghetti and canned vegetables warmed on our little butane stove were about as good as it got. Our last night there, however, we managed to scrape together enough to visit one of the seafood restaurants lining the beachside promenade. There, opposite the shimmering black of the Mediterranean we ate a magnificent paella, overflowing with shrimp and mussels that had been pulled from Tossa’s offshore depths that very morning, and washed it down with a big carafe of local red wine. That paella stands out in my memory as one of the best things I’ve ever eaten, though in all honesty I can’t be sure that it wasn’t just the combination of warm sea breezes and young love playing tricks on my tastebuds.

Then finally two years ago, we went back to Catalonia, and this time we got it right: we went there to eat. We spent five belly-busting days in Barcelona, confirming beyond a shadow of a doubt that not only is Catalonia’s capital one of the world’s greatest food cities, with restaurants both traditional and modern providing some of the most consistently amazing food at some of the world’s most reasonable prices, but that Catalan food is indeed a great cuisine in its own right, or as Colman Andrews proclaimed in his 1988 book Catalan Cuisine, "the last great undiscovered cuisine in Europe".

The really unbelievable thing is that it is still undiscovered. Indeed, not much has changed since 1988; Catalan cuisine is still languishing in obscurity, conspicuously absent from the pages of magazines that still find plenty to say about the cuisines of Provence and Tuscany. Spanish cuisine (read: tapas, tapas, tapas) has had its few minutes of fame as the darling of the world’s gastronomic trendsetters, but while there may be a few shared dishes and techniques, Catalan cuisine and the other cuisines of Spain are as different from each other as, well, regional cuisines all around the Mediterranean. Everyone knows about El Bulli, of course, and thanks to one uber-innovative Catalan chef everyone has heard of foams and powders and skinless ravioli, but how many people have heard of esqueixada, suquet, samfaina and coca? How many know that traditional Catalan thickeners include nuts, bread and chocolate, or that in this part of Spain, blending garlic and olive oil with honey and apples is the work of grandmothers rather than envelope-pushing, cutting-edge chefs?

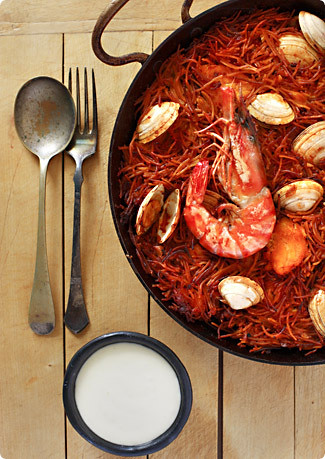
And then of course there’s fideuà, truly one of the overlooked glories of the Catalan repertoire. This poor cousin of paella, assembled from toasted noodles and seafood, has been sustaining Valencian fishermen for generations. It was originally prepared on board their boats in porcelain washbasins with whatever dregs the fishermen wouldn’t be able to sell; nowadays, of course, it’s gone considerably more upmarket and people stick all manner of fancy things into it. No matter how humble or exalted the ingredients, though, this dish really packs a flavor punch: slowly caramelized onions, tomatoes and garlic  – called a sofregit in Catalan – provide a backbone for the rich, saffron-laced stock, the supple, nutty noodles, and of course the stars of the show, plump chunks of your favorite sea critters hiding underneath the crusty top.  With top-quality ingredients this would be rhapsody-inducing enough, but those clever Catalans take it one step further and pair this masterpiece with another, namely a hearty dollop of their gutsy garlic-and-oil emulsion called allioli, a sauce so exquisite it would make 20-year-old Birkenstocks taste good. And all exaggeration aside, any cuisine that can boast a feat like that surely deserves to be recognized sooner rather than later.


Fideuà

I think the most important thing to remember about fideuà is that any recipe should be treated as a rough guide only, particularly when it comes to the seafood you put in. A mix of crustaceans, molluscs and fish is my favorite, but substitute as needed according to availability and preference. And do try your best to track down some shrimp complete with he
ads and shells – these make an incredibly flavorful stock and improve the complexity of the finished dish enormously. If you can’t, though, just get ahold of the best fish stock you can – no bouillon cubes allowed!! Also, many people have asked me about paella pans over the years, so I’ll tell you my preferences here, in case you happen to be in the market for one. The cheapest ones tend to be made from carbon steel, and while they work fine, they rust easily if food is left in them and/or they are not seasoned properly. I much prefer enamelled pans, which are affordable, don’t rust and are much easier to clean and maintain. Nonstick pans are fine too, though they prevent that nice bottom crust from forming on the rice or noodles; heavy-gauge stainless steel is generally considered to be the best, but these also tend to be the most expensive. As for size, I used to have a 34cm (13-inch) pan, and found it a little small for the quantities I generally wanted to cook; now I use a 38cm (15-inch) pan and find it perfect for dinner parties of 4-6 people. If you’ll regularly be cooking for more than that, go for something even bigger.
Serves: 6

about 1/2 cup (125ml) olive oil
about 1 lb (500g) fideo noodles, or angel hair pasta broken into 1-inch lengths
1 lb (500g) large shell-on raw shrimp (with heads attached, if possible)
2 tablespoons garlic, chopped, divided
10 cups (2.5l) fish stock (or 7 cups clam juice diluted with 3 cups water)
1/2 teaspoon saffron threads, crumbled
2 medium onions, finely chopped
4 canned plum tomatoes, drained and chopped
2 teaspoons sweet paprika
1 lb (500g) small clams, scrubbed, soaked in cold water for 2-3 hours with a tablespoon of cornmeal (discard any that don’t close firmly when you tap them)
1 lb (500g) monkfish or other firm, white fish fillets, cut into 2-inch pieces
salt 

1. Begin by toasting the pasta. Heat 2 tablespoons of oil in a 15-inch (38cm) paella pan or a large heavy (ovenproof) skillet over medium heat*. Add half the noodles and cook, stirring constantly, until they have turned a more or less uniform toasty brown. Watch them carefully as they burn easily. Remove from the pan to a large bowl, making sure none are left in the pan. Add 1 more tablespoon oil to the pan and repeat with the other half of the noodles. Remove these to the bowl as well.

2. Peel the shrimp, reserving their shells and heads (leave a couple with their shells and heads on to garnish the fideuà, if you like). Heat another 2 tablespoons oil in the paella pan or skillet over high heat and when hot, add the shrimp (both peeled and unpeeled) and half the garlic. Sauté just until the shrimp has turned pink, about 1 minute. Remove from the pan and set aside.

3. Make the stock. In a large, heavy-bottomed saucepan, heat 1 more tablespoon of the oil over medium-high heat. Add the shrimp shells and heads and stir until pink and fragrant, 2-3 minutes. Add the fish stock and saffron, bring to a boil, reduce the heat and let simmer uncovered until the stock has reduced to 6-7 cups, about 30 minutes. Before using, strain out the shrimp shells and taste for seasoning – it should be very well seasoned but not unpleasantly salty. Add more salt, or dilute with a bit of water, as necessary.

4. Meanwhile, preheat the oven to 400F/200C. Heat another 2-3 tablespoons oil in your paella pan or skillet over medium heat. Add the onions and cook slowly, stirring frequently and lowering the heat as needed, until they have softened and caramelized, about 25-30 minutes. Add a bit of water if they look in danger of burning. Add the tomatoes and continue cooking until the tomatoes and softened and caramelized and both onions and tomatoes seem to have melted together, about another 10 minutes. Add the remaining tablespoon of garlic and the paprika and stir until fragrant, about another minute or two.

5. Add the toasted noodles and stir gently to coat with the onion mixture. Add about 4 cups of the strained fish stock, stirring well to distribute everything. Using multiple burners and rotating the pan as necessary, bring the mixture to a boil over medium heat. Nestle the cooked peeled shrimp, drained clams, and fish pieces in the noodle and stock mixture. Add a bit more stock if there’s not enough to mostly cover the seafood. Let cook on the stovetop, rotating the pan as necessary to heat everything evenly, until the noodles are getting al dente and most of the stock has been absorbed, about 7-10 minutes.

6. Pour another two cups of stock into the pan, arrange the whole (shell-on) jumbo shrimp decoratively on top, and transfer to the oven. Bake until the top of the noodles are crusty and most of the stock has been absorbed, about 10-15 minutes. Discard any clams that haven’t opened.

Serve immediately, accompanied by plenty of lemon wedges and a large bowl of allioli. 

*If you are going to be using a paella pan, to make things easier on yourself (particularly if your pan is quite large) you can perform all the steps through the making of the sofregit (step 4) in a skillet (doesn’t need to be ovenproof), then transfer everything to the paella pan for the final stovetop and oven cooking. This reduces the amount of time you’ll spend juggling the pan over multiple burners trying to get everything cooked evenly.

(Mock) Allioli

Real allioli is made by pounding garlic and salt in a mortar and slowly stirring in olive oil until an emulsion is formed. It can be tricky, and truth be told I like this much simpler version just as much. If you want to try your hand at the real thing, there’s a good recipe here; for this version, just remember to start it at least an hour before you plan to serve it.

1 cup high-quality mayonnaise
1/4 cup olive oil
3-4 cloves garlic, pressed or crushed in a mortar
juice of half a lemon (or to taste)
salt to taste
1-2 tablespoons water (optional, for achieving a looser consistency) 

Mix everything together and refrigerate, covered, for at least an hour to allow flavors to blend. This keeps a couple of weeks in the fridge.


Frustration, Deprivation, Improvisation

387371797_79748a4eea.jpg
Cannelé Colossus


It’s the bane of adventurous food-lovers everywhere. It’s worse than gastrointestinal bugs, worse than meat of unidentifiable origins, worse than smarmy waiters who try to convince you that the tourist menu is really, truly what the locals order. No, the worst part of traveling with a healthy appetite is not the host of unpleasantries you risk facing at any given meal, it’s actually the prospect of encountering something really, well, good.

Before you protest, think about it for a minute. What, after all, usually happens when you discover a new favorite food? You want to eat it again, of course. This would be no problem at all if you’d just discovered this new food at the bistro around the corner, but if your one and only taste was at, say, a street stall in northern Thailand, or a tiny trattoria on the south coast of Sicily, well, things start to get a lot more complicated. It’s not like you can jump on a plane and fly halfway around the world every time the craving hits. And cravings are tricky things, not only because they tend to grow rather than subside over time, but because they laugh in the face of your attempts to placate them with some pale, watered-down, locally-available facsimile of the real thing. No, these kind of cravings demand the real deal, something anyone who has ever laid awake at night thinking about the musical snap in the crust of that wood-fired pizza in Naples or the ethereal complexity of the sauce slathered on that rack of ribs in Memphis can painfully comprehend. It’s almost enough to make you swear off travel completely, if only to forcibly limit the length of the ever-growing register of frustration and deprivation it spawns (to borrow a term from the great food writer Calvin Trillin).

Although I have traveled and tasted considerably less than the venerable Mr. Trillin, my own register is certainly not wanting for entries. At one end are all the general cravings I suffer from since moving to Scotland: really good Mexican food; decent and affordable sushi; all those cheap and authentic Ethiopian, Vietnamese and Korean meals I used to take for granted when I lived in more culturally diverse places. These entire-cuisine cravings are potent, but they’re also pretty pointless unless I’m prepared to endure many backbreaking hours in the kitchen straining my own mole and pressing my own tortillas, which, let’s face it, due to my lack of experience rarely turn out that good anyway.

On the other end of the frustration and deprivation spectrum are specific foods – local specialties, usually, though a restaurant creation or two has been known to sneak in as well. These are things I actually feel I have a shot at recreating, and as long as I keep the number from any specific trip reasonably low, I am usually able to focus long enough to concoct decent approximations. Take, for example, my last trip to Paris. While nearly everything I ate there was good, two things continued to haunt my thoughts long after returning home. One was the salted caramel ice cream from Berthillon (which, by the way, I am this close to cracking); the other were those stubby little burnished-brown pastries from Bordeaux called cannelés, the closest thing I have experienced to licking a voluptuously silky crème brûlée from the palm of my hand.

I began researching recipes for cannelés almost immediately after returning and was delighted to discover that they’re not actually that hard to make at home. What stopped me cold, however, was the realization that they require special molds – special copper molds to be precise (other types exist, but consensus seems to be that they’re not worth it), costing somewhere in the neighborhood of $15 each. Multiply that by the eight or ten needed to churn out a batch of cannelés, and I had a major pit forming in the bottom of my stomach. I mean, it’s not like I haven’t spent that much money on kitchen equipment before, but I’ve never spent that much on kitchen equipment that only serves one, single, very specific purpose.

Finding this conflict between stomach and wallet irreconcilable, I tried to put off thinking about it, hoping that a lucky lottery ticket would solve the matter for me. But as the months passed, the lottery ticket failed to materialize and the cravings grew stronger, out of my desperation a crazy idea was hatched. What if I took the idea behind the cannelé and reinvented it into something, well, bigger? I mean, as long as there were still an abundance of crust and fluted ridges and a long stint in a hot oven, wouldn’t it be possible to just upsize this little delicacy using equipment I already had?

Well, the short answer to this long story is yes, it is – and it’s not only possible, it’s fantastic. Everything great about cannelés is present in this pimped-up version – the chewy, caramelly exterior, the soft, custardy interior, the subtle, fragrant sweetness – only that it’s served in slices. Though admittedly lacking some of the aesthetic charm of the original, it goes just as well with a cup of coffee to provide a little afternoon pick-me-up, and eats out of hand quite nicely too if grabbing some to go is more your style. It certainly won’t win any awards for authenticity, and probably will set some fingers wagging furiously in Bordeaux, but really, isn’t that an awfully small price to pay for feeling that much less frustrated and deprived?

Cannelé Colossus

No, your eyes did not deceive you – this gigantic cannelé is baked in a good old American bundt pan, which happily seems to be making a comeback in baking circles. Those of you outside of North America might want to try a Kugelhopf pan, which a bit narrower and taller but still has the same general shape (though they do tend to run a bit smaller so some recipe adjustments may be necessary). If all else fails I imagine a plain tube pan or even a savarin mold might do the trick – you’ll never know unless you try! Just make sure whatever pan you use is quite thick and heavy, to evenly distribute the heat during the long, long baking time. I should also point out that while the white oil is technically optional, it is important to giving the right texture and shine to the crust. Beeswax may seem like an odd ingredient but it is easy to track down online and costs very little – and is well worth investing in if you like cannelés the slightest bit!
Source: adapted from Paula Wolfert’s The Slow Mediterranean Kitchen

for white oil:
1 oz (30g) beeswax
1 cup (250ml) vegetable oil

for cannelés:
2 vanilla beans, or 2 teaspoons vanilla extract
4 cups (1ltr) whole milk

2 cups (400g) superfine/caster sugar
1 1/2 cups (200g) cake flour
1/4 teaspoon salt
4 tablespoons (60g) cold unsalted butter, diced
10 large egg yolks
4 tablespoons (60ml) dark rum

equipment: a 12-cup (10-inch) heavy
-duty bundt pan

For the white oil, melt the beeswax in a glass measuring cup set inside a pan of simmering water. When completely melted, stir in the oil, a little at a time, waiting for the mixture to remelt each time before adding more. When all the oil is incorporated, remove the cup from the pan and let cool slightly. Rewarm the mixture before using, if necessary. 

Split the vanilla beans in half and scrape out the seeds, then throw the seeds and beans into a medium saucepan with the milk. Bring to a boil, then cover and set aside to cool to 183F (about 5-7 minutes). In a food processor, combine the sugar, flour, salt and butter and pulse until the butter is well distributed. Add the egg yolks one by one, pulsing just until the mixture starts to come together into a batter. With the machine on, slowly and steadily pour in the hot milk through the feed tube, discarding the vanilla beans. Strain the mixture into a large bowl to remove any lumps, pressing through any congealed egg yolk. Stir in the rum (and vanilla extract if that’s what you are using), cover with plastic wrap and refrigerate overnight.

The next day preheat your oven to 400F/200C and center a rack in the middle of the oven. Grease a 12-cup bundt pan with a thin film of the white oil (it should really be a fine coat, so wipe out any excess with a paper towel). Place the pan in the freezer for about 15 minutes, then remove and fill with the cold batter (give it a stir first to re-homogenize). Place directly on the center oven rack and bake for 1 hour, then reduce the heat to 350F/170C and continue baking until the crust looks deep brown and smells caramelized, 2-3 hours more. How dark you let it get is actually up to you – the darker it gets the more bittersweet it will taste (you can unmold the cannelé and check its color periodically if you want to be sure; also you can loosely cover the top with aluminum foil if it looks in danger of burning). When it’s done unmold it immediately and let it cool completely on a rack. When it’s hot the crust will still be soft, but will harden upon cooling. The cannelé is best enjoyed at room temperature or slightly warm; the crust will soften over time but a few minutes in a hot oven should crisp it up again like new.


List-Making for Dummies

374691183_5ea7794dff.jpg
Pão de Queijo (Brazilian Cheese Bread)


I am not what you would call the world’s most organized person. While thankfully hygiene standards don’t usually drop below a certain level in our household, mess is another matter entirely; at times I’ve wondered if I emit some kind of magnetic attraction for chaos as no matter how hard I try to keep things neat, tidy and in their rightful places, they never seem to stay that way. One of the prime examples of this (besides my half of the closet, and believe me, you do not want to go there) is my to-cook list for this very blog – or as I should more accurately say, my to-cook lists.

You see, once upon a time, back when this site was young and I knew that much of its continued success would depend on my being methodical and disciplined about coming up with new content, I bought myself a little notebook. In this notebook I intended to keep one centralized, comprehensive list of things I wanted to cook, including the random ideas that occasionally assault me as well as the many tempting recipes I run across in cookbooks and magazines, which I would be able to refer to whenever I needed inspiration. In addition, having a list would allow me to phase out my far less efficient system of flagging finds with bits of post-it notes or folding down page corners – both of which tended to result in more forgotten recipes than culinary epiphanies.

It actually went very well for a few months, and I dutifully documented every appetizing inspiration and tempting recipe I ran across, and even managed to make a few of them while I was at it. But as I might have predicted, my enthusiasm for this new system eventually began to wane; without even realizing it I started consulting my notebook less and less, and eventually it got itself placed in some pile of stuff that my dear chaos-phobic (i.e. German) husband in one of his I-can’t-take-this-mess-anymore fits relocated to some dark and invisible corner of our apartment.

Although I didn’t really miss the notebook itself, the problem was that I had gotten used to jotting down recipe references instead of marking their location at the source, and thus when the notebook disappeared I simply carried on writing those little notes on whatever paper I could find. Soon our apartment, in addition to drowning in cookbooks and food magazines, was awash with little bits of paper – backs of envelopes, torn corners of bank statements, margins of old shopping lists – enthusiastically reminding me to make Azeri Meatball Stew or some great new variation on eggplant parmesan. I even made a stab at locating the notebook when I realized what a mess I was making, but that failed – as did my half-hearted attempt to collect all those scraps of paper into a central scrap location, since I could never remember where it was. The end result of all this chaos, of course, was that unless a recipe was so phenomenally tempting and immediately do-able, chances are it would be noted, lost and forgotten long before it had a fighting chance to actually be made.

But as luck would have it, a couple of weeks ago I was rifling through a large stack of magazines and old mail in our living room – something I swear I’d done a hundred times already – looking for a misplaced utility bill, when something familiar slipped out: my old notebook.

Clutching it like a long-lost friend, I settled into the sofa and cracked it open, curious to see what exactly I had intended to cook a year or so ago. Inside was a long list of dishes, some of which I couldn’t for the life of me understand what had attracted me but most of which still sounded pretty good. A few even caused me to slap my forehead in disbelief – how could I have forgotten that one? The one that caused me the most head-slapping, however, was the entry at the very top of the list. This was something I’d been intending to make for so long that it was likely the very thing that compelled me to start keeping a list in the first place, in hopes that doing so would finally motivate me to cross it off. Unlike the rest of the list, this entry had no cookbook reference or involved description, just three simple words: pão de queijo. That was all the reminder I needed.

Pão de queijo literally translates from Portuguese as ‘cheese bread’, and though that’s essentially what these puffy little rolls are, the name only tells half the story. The first thing to know about pão de queijo is that the relationship Brazilians have with it borders on obsessive. In researching recipes I stumbled upon one by Valentina (also the author of Trembom), and in the headnotes she relates how she once joined a Brazilian online forum called ‘I’m crazy about pão de queijo’ which was dedicated to nothing else but discussing the merits of, and sharing recipes for, versions of this tasty snack. At the time she joined the forum had more than 200,000 members(!).

The second thing to know is that these little breads are fundamentally different from the majority of cheese-bready things around the world in that they are naturally and completely gluten-free. While they seem to be cousins to the French gougères in terms of technique and appearance, they’re made entirely with tapioca starch (the fine, white powder extracted from cassava roots), which gives them a texture quite unlike anything else. Their transformation is actually quite miraculous to watch: they go into a hot oven as lumpy, ragged little mounds with the consistency of spent chewing gum and emerge light as air, crusty around the edges and possessing a wonderful, toothsome chew. Brazilians, it seems, love to eat them for breakfast with coffee, though I’m just as inclined to nibble them with a pre-dinner drink, and they’d also be a great accompaniment to a hearty soup or stew, or could even be fancied up as party food with a stuffing of some kind.

Brazilians of the world, you are really onto a good thing here – though I’m sure you don’t need me telling you that this is one for the permanent recipe file. And speaking of that file – you know, that centralized, organized place I keep track of all the recipes I intend to make again – well, it’s about time I put one together, don’t you think? I’ll just have to put it on my list. 


Pão de Queijo

There seems to be widespread consensus that these are quite tricky to make, but I didn’t find this to be the case. One thing I would recommend is to measure the tapioca starch by weight if you can, which is infinitely more reliable than by volume. If you do measure by volume, note that I use the lightly-aerate-then-scoop-and-level method. In the recipe I’ve given some clues as to the texture you’re aiming for in the dough – the important thing to note is that it should not actually be firm enough to make balls, but rather soft, misshapen little mounds. If you’re worried, you can always test-bake a couple to see if they puff up like they should. As for the tapioca starch/flour, you should be able to locate some in an Asian or other ethnic market (where you might find it under the names yuca, manioc, cassava or polvilho azedo/doce, any one of which will fit the bill), or any place that stocks gluten-free baking supplies.

yield: 20-30 rolls, depending on size 
source: adapted from Valentina and other online sources

4 cups (500g) tapioca starch (aka polvilho, yuca, ma
nioc or cassava flour/starch), plus more if needed
1 1/2 teaspoons salt
1 1/2 cups (375ml) milk
1/2 cup (115g/125ml) unsalted butter or vegetable oil (oil is traditional, butter gives more flavor)
2 eggs, at room temperature
7oz (200g) finely-grated parmesan cheese

In the bowl of your heavy-duty stand mixer* combine the salt and tapioca starch. In a saucepan combine the milk and butter and bring to a boil, stirring occasionally to prevent scorching. Fit your mixer with the paddle attachment, turn on medium-low, and begin drizzling in the hot milk mixture. At first it will all clump up, but keep drizzling in, stopping and scraping down the bowl and paddle as necessary, until it comes together and forms a smooth, thick, gluey dough. Beat for a minute or two, then turn the mixer off, cover the bowl with a cloth and let rest for 15 minutes, or until just warm to the touch.

Preheat the oven to 425F/210C. When the dough has cooled down a bit, turn the mixer to medium speed and add the eggs one by one. When they are completely incorporated add the cheese and mix for another minute. The dough should have a sticky, stretchy consistency somewhat like spent chewing gum (but a little softer). It shouldn’t be firm enough to roll into balls, but it should be firm enough to hold its shape on a spoon. Add a bit more starch or a splash more milk if needed.

Line two large baking sheets with parchment paper. Using a well-greased spoon (or a couple of spoons, or a spoon and your hands – whatever works), drop mounds of dough about the size of unshelled walnuts onto the sheets, spacing them at least an inch (2.5cm) apart. Don’t worry if they are not perfectly shaped, or if the surfaces are not smooth – in the heat of the oven the irregularities will melt away. Bake them for about 20-25 minutes, rotating the baking sheets halfway, until they’ve puffed up nicely and are golden brown in spots. Remove immediately to cooling racks and allow them to cool slightly before eating. The recipes say to enjoy them warm, but I liked them at room temperature as well – the texture is slightly different but still very good.

(*I don’t think I’d trust a handheld mixer to confront this sticky, viscous dough and survive, but it can be mixed by hand in a large bowl with a sturdy spoon – just be prepared for a good workout!)